Sunday, May 15, 2011

May Charcutepalooza Challenge: The pork grind!

For the May assignment I made chorizo. Normally, I am not a fan of Mexican style chorizo that I find in the grocery store. The texture is different and it always seems oily and watery. To my surprise, I really like the seasoning and the texture of the sausage that I made for the May challenge.  Before I started, I assembled my Kitchen Aid grinder.  I lined up the worm and the pins by placing the attachment on the Mixer. Then I placed it in the freezer.  I have learned from experience, that it is difficult to get the frozen attachment lined up so that is why I follow that little step.


Pork Shoulder tossed with spices
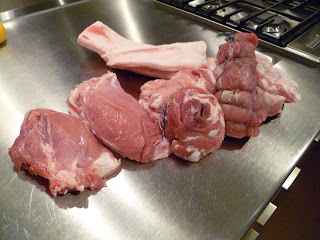
I started with a 7lb bone in pork shoulder. I deboned the shoulder and chopped into a 2 inch cubes.  I was practicing my butchering skills by taking the shoulder apart by muscles.  I place the cubes in a glass bowl that was sitting in a bigger bowl of ice to keep it cool.  I ended up with 5.5 lbs of pork, but it seemed like it was very lean.  I decided I could increase the total amount by adding back fat. And I would have enough pork  for a pound of breakfast sausage. I added 8 oz of back fat to the chorizo bowl containing 4.5 lbs to make a total of 5 lbs. I took the other pound of pork cubes, added about 4 oz. of back fat to make a breakfast sausage.


Grinder and Seasoned Pork in Freezer

Next I placed the pork in the fridge and mixed up the spices.  I tossed the pork and then I placed it in freezer to lower the temperature before grinding.  I like to grind when the meat is around 35 degrees. While the meat was cooling,  I prepared for the grinding process.  I wiped everything down with a bleach/water mixture. Then I placed the metal mixer bowl in a bowl of ice.

Time to grind the meat....I ground the breakfast sausage first. Cleaned the blade and plate, then started on the Chorizo. A few..... minutes or more later. I had a nice bowl of ground sausage.  I added the tequila and red wine vinegar and emsulfied the sausage. Cathy - thanks for the tip to use a plastic bag to force all the meat through the grinder. It works great!

Next is the fun part, I put the sausage in the fridge and put a small patty in a pan to "test the seasoning".  I didn't realize that I hadn't eaten lunch before I started making sausage.  It was about 3:30.  That patty tasted pretty good, but I needed to try it again... another patty, this time a test of the texture and fat content.  And then another patty. Ummm that was a good lunch. The seasoning was spot on...


Test sample #1 , that was followed by test sample 2 &3

Look! the right amount of fat, browns nicely and the texture is firm.  I decided to go ahead and fill some casings. I stuffed about half the sausage and shaped the other half into couple logs. 

The next day I smoke the sausage in the Bradley. I must say the Bradley is working great.  No more wasted
bisquettes. I have used it for spare ribs that were smoked with a spicy dry rub. The ribs were juicy and tender.  I also smoked some country style ribs that I used in a Pork Mole and the next day was mixed with pinto beans. I PIGGED out. 

I don't have a recipe or pictures of my first meal with the loose Chorizo. My plan was a stacked enchilada with cheese, chorizo and scrambled eggs.  The tortilla was tough and it didn't work very well.

The breakfast sausage:  I found that the garlic and sage over powered the sausage for breakfast.  I was reading a Bon Appetit article on the best way to cook pasta... So I invented a new pasta dish using the breakfast sausage. Playing off the stronger garlic and sage flavor, I paired it with butternut squash and whole wheat spaghetti in an alfredo type sauce. It had the flavors of gnochhi and squash, with a twist of meat.  Here is the recipe.

Oinkjoint Sausage and Butternut Squash Spaghetti

11/2 cup butternut squash, peeled and 1/2" dice
1 lb sage and garlic breakfast sausage 
Cook spaghetti for four people to just before al dente
Cream and reserved pasta water
Grated Pecorino Romano

Saute the squash in vegetable oil until tender and browned. Remove from pan.  Add small amount of oil and break sausage in the pan.  Add fresh ground pepper.  When browned, return squash to the pan. Deglaze the pan with a splash of chicken stock.  Add enough whipping cream to cover the bottom of the pan. Add a handful of Pecorino. When heated and cheese is incorporated, add the almost al dente spaghetti to the saute pan. Toss to coat.  Add 1/2 cup hot pasta water to pan and continue tossing pasta. Add more pasta water if needed.  Cook until pasta is al dente and nicely coated with sauce.  Garnish with more Pecorino. 

This met my expectations of sage, squash, pasta  in a creamy sauce.  The sausage took it over the top. 

After writing this post, I had to try the chorizo again. I browned some diced potatoes and onions in oil. I sliced a couple links of the smoked chorizo, and added them to the pan.  Added some chicken stock, let the dish simmer until the potatoes were soft and the sauce had thickened. I served the dish with a fried egg. It was yummy.  The sausage seasoned the potatoes and gave the dish a real kick. I am really please with my work this month... practice makes it better!

Saturday, April 16, 2011

April Charcutepalooza- Smokin' the good stuff

What a busy month! Yes, I am a day late, but I got my taxes filed...took a trip to Beverly Hills (specifically to go to the SAAM Dining Room - part of José Andrés' The Bazaar with a tasting menu similar to the minibar in DC) and Dana Point, CA, hosted a retirement dinner on April 14 for a dear colleague that I will miss tremendously and we spent last weekend at the Westmoreland State Park to direct the Quantico Orienteering Meet.  I had business trips to Topeka, KS, New York City and Atlanta, GA. I think those are legitimate excuses.... I work hard and play hard!

Shoulder, Ventreche, Jambon and Back Fat

The best part of the month was that  I attended the Stonyman Gourmet Farmer Cochon & Charcuterie: A Workshop from Gascony in Virginia's Blue Ridge taught by Kate Hill and French butcher Dominique Chapolard. I now dream of bringing home a half of cochon and delicately disassembling the muscles into beautiful cuts of pork.  We were given the products of Dominique's work and that is the source of my pork that I smoked for this challenge.  I enjoyed the day with fellow Charcutepaloozers and area chefs that attended the workshop.  We had a wonderful lunch prepared by Susan and Alan James with perfect wine selections from Gascony region in southwest France. 

Spicy Rub on Rolled Shoulder

Now I have the superb pork product and I just got an email that my Bradley Smoker is arriving on Friday. My plan of attack:  Use the tied piece of shoulder for Spicy Smoked Pork and use the other shoulder pieces for Tasso. I had the spicy rub in the spice drawer from another use, so I coated the shoulder and placed it in the fridge the night before.  I had the dry cure mixed up from the bacon challenge that I used the next day for the Tasso.  I let it cure in the fridge four hours, then I rinsed and covered it with the spices listed in Charcuterie. I guess I have developed a pantry of a charcutier resulting in rapid prep.... 


Dry Cure on Tasso

Cured, rubbed and ready for the Smoker


Next step assemble and season my new Bradley Smoker.  I have to say my first experience with the smoker was a bit of a problem... While seasoning my smoker, I found the bisquette dispenser was advancing two at a time, allowing the unburned bisquettes to fall into the water bowl and turn to mush. It is annoying enough that Bradley locks you into buying their products to make the smoke, but I get down right pissed when their machine wastes their expensive bisquettes.  I sent them an email, and their email robot sent back a suggestion that the advance button is stuck or it needed cleaning. It was brand new, so it doesn't need cleaning. I don't think the button was stuck either, but I haven't had time to use/test it again. I suspect the calibration of the advancer is off. So much for my rant on the Bradley Smoker.... It made really good smoke even if it used 20 bisquettes in 4 hours instead of the 12 it was supposed to use. (I figured out a way to salvage some of the unburned bisquettes for later use.)

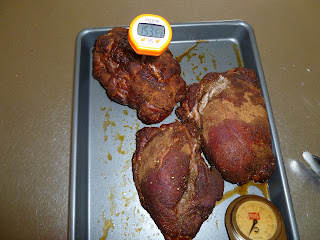
I kept the smoker temperature around 200 degrees. I put an oven thermometer on the same rack as the meat. The thermometer in the door registered about 20 degrees lower.  It took about three hours to get the meat to an internal temp of 150.  Doesn't it look good?  The best thing about making Tasso is that you must use it in Jambalaya. I make a pretty mean Cajun style Jambalaya. My first cooking class in 1985 was a three hour session at the New Orleans School of Cooking. I learned how to make a great roux, gumbo, jambalaya and bread pudding with a bourbon sauce. I have adapted these techniques and recipes over the years to make them my own.  

Oinkjoint Jambalaya

1/2 cup red-brown roux (see below)
2 cups chopped onion (half red, half sweet yellow)
1 cup chopped bell pepper (half red, half green) 
1 cup chopped celery
3 cloves garlic minced
3/4 lb Tasso chopped
1 lb Andouille Sausage sliced
Chrystal Hot Sauce to taste
1 teaspoon Cayenne (or more to taste)
1 teaspoon fresh Thyme
1 cup long grain rice 
1/2 cup white wine
2 cups chicken broth
Salt and Pepper to taste

Dark Brown Roux

To make the roux, stir 1/4 cup vegetable oil and 1/4 cup flour over medium low heat until it turns deep red-brown. Be patient, keep stirring so it doesn't burn. (You can make larger portions and refrigerate for later use)   Add trinity: onions, peppers and celery to the hot roux and cook until soft, stirring frequently.  I love the smell of the trinity and roux when it first comes together. 


Trinity and Meats in the Roux
I use a 1/2 inch chop on my trinity for this version of jambalaya because I want texture in the final dish. Add the garlic, Tasso and Andouille Sausage and let brown.


Cold Smoked Andouille

The Andouille is house made. It is my first attempt at cold smoking. I made this for my Mardi Gras party using the recipe in Charcuterie on page 167-168.  I will do a separate post on this project. But I was lucky, because it was 25 degrees outside the day I cold smoked on my gas grill which helped me keep the temp around 90 degrees. 


Look at that smoke ring on the Tasso


This Tasso was amazing. The flavor, spices, smoke and high quality pork made for a yummy jambalaya. 

Season the pot with the Chrystal Hot Sauce, cayenne, thyme to taste.  I also add Meat Magic at this point. For variations, you can add some sauteed chicken breasts or thighs.


Ready for the Oven


Add the wine and chicken broth. Let cook for a couple minutes. Taste for seasoning.  You should over salt at this point.  Add the rice and make sure it is distributed evenly through out the pan. Bring to a boil, remove from heat and place in a 350 degree oven for 30-40 minutes until rice is tender.


Fluff and Check Seasoning before you serve
Just out of the oven, taste for seasoning, it may need more salt. Open an Abita and get ready for some goodness.  It took us three meals but we ate the whole pan. 


Spicy Smoked Pork Shoulder with Oinkjoint Jambalaya


 I shredded some of the spicy pork shoulder that I smoked with the Tasso and served it on the side. 

Tuesday, March 15, 2011

March Charcutepalooza- Brining Corned Beef Tongue

I learned that I don't like beef tongue. I wanted to cook beef tongue and actually had one in the freezer. So when we received the March projects, I was excited. Yep, I don't like beef tongue.  The meat was soft and spongy and weird.


Doesn't this make you want to say la la la la

But I like brining and corned beef.  I followed all the directions, made my own pickling spices, waited 5 days while Mr. Tongue bathed in the brine. On day 6, I boiled the tongue for three hours. Then I put him in the fridge and saved a quart of cooking liquid and headed for the airport.

My plan was to serve the tongue at our Mardi Gras party on a Charcuterie Board.  I chose to use the small end of the tongue.  I didn't get a picture of the board, but I have 30 guests that will confirm that it included the corned beef tongue, beef tenderloin bresaola, duck prosciutto, pork soppressata, duck confit rillets and country pate using veal, pork, ham and chicken livers. I made some fermented pickles of carrot, red onion and cauliflower that I served with the board. Our guests didn't like the tongue as well as the bresaola and soppressata.  Here is a view of the leftovers that I photographed after the party.  I liked the flavor, it tasted like corned beef.  But I couldn't get past the texture. It was soft and weird.


Looks yummy...not
I found the vegetables kinda salty and I missed the vinegar that you expect from pickles. I also started some sauerkraut. I guess I didn't read the directions closely, as I missed the part where you are supposed to skim the scum... I checked it on day 13, found really cool looking mold.  I removed the plates I was using to weigh down the cabbage, as well as the towel without leaving mold in the juice.  I tasted the kraut and it was not sour, it was just salty. I left it on the counter for a couple days while I was deciding whether to pitch it or wait. I had the veggies and the kraut in a cool room, mostly 60 degrees. The kitchen is a warmer place and after a couple days the kraut started to taste like kraut.  So I decided to wait and place the cabbage in a bit warmer area to see what happens.

Oinkjoint Corned Beef Tongue Hash

 I used the large end of the tongue in a corned beef hash. It makes a great brunch dish.  Below is my recipe and it was quite tasty. 

1 lb corned beef tongue
1 red onion
1 parsnip
1 red bell pepper
1 leek
2 golden russet potatoes
1 T vegetable oil
2 cups reserved cooking broth from the corned beef
1 cup stout

Reduce the cooking broth and stout to half. Chop all the vegetables and tongue with a 1/2" dice. Heat the oil in a saute pan, add the onion, then the parsnip sauteing until soft. Add the red peppers and  leeks and cook for 5 minutes.  Add the potatoes and cook for another 10 minutes until they are starting to brown.  At this point I seasoned the veggies with a pinch of ground coriander and black pepper.  Next, add the beef and let cook until heated through. Add the reduced broth/ stout mixture. Cover and cook on medium low until potatoes are tender and a gravy develops. Taste and adjust seasoning. Serves 4 people.


Onion and Parsnip 

Almost done

I placed a poached egg on top of each dish. I bet this would pair well with Guinness or satisfy those late night munchies.
Oinkjoint Corned Beef Tongue Hash - a stoner's delight


Monday, February 14, 2011

Ode to the Red Wattle Pork Belly

This is my first Charcutepalooza post.  To confess, the reason I started this blog was to enter the contest. Of course I had been thinking about writing a blog for years, but when I plopped down in my morning coffee drinking spot and found the Washington Post food section waiting for me... (It was the story of Mrs. Wheelbarrow and The Yummy Mummy Charcutepalooza) I knew a blog was in my immediate future.

A little background... I bought the book, Charcuterie: The Craft of Salting, Smoking, and Curing after seeing Bryan Polcyn on Anthony Bourdain: No Reservations...at the time my significant other, Gary, was complaining that there wasn't a good selection of Gallo Italian dry salami in northern Virginia and read how to make them. He said it was risky...as in "it could kill us if...," and required a special curing environment, bacteria and mold.  He knows after telling me about molecular gastronomy in 2006, that if it is impossible for the home cook I must try it until I figure it out. 

Before reading the Washington Post's "Charcutepalooza" feature story, I had some experience with this craft. I had made with reasonable and sometimes awesome success: Duck Ham, Canadian Bacon, Fresh Bacon, Spicy Smoked Pork Shoulder w/ Carolina BBQ, Breakfast Sausage, Smoked Andouille, Soppressata, Bresaola (in process), and Pate Grandmere.  I currently have 5lbs of cold smoked andouille drying for our Mardi Gras Party on March 5.  All of these projects used Charcuterie as my guide book.

My friend, Cindy, who cooks with me sometimes...and I made Bangers & Mash from Heston Blumenthal's, In Search of Perfection - following each step as directed... thinking that if we missed perfection they would still be pretty darn good and they were great...the best bangers I have eaten. We had to toast white bread and soak it and then use the toast water in the bangers along with crushed rusk. Really Heston?   On another Saturday we started with 20 lbs of pork shoulder and back fat and made Sweet Italian, Bratwurst, Chorizo and Linguica. We learned not to use cured back fat... too salty. It was summer and we tried to cold smoke and it just didn't work. But the hot smoked sausages were still very tasty. Sadly, Cindy is moving to Seattle, so I am in search of a new cooking partner...Any volunteers?

 
House Made Charcuterie and Sour Dough Bread
I guess this is a long way of staying I am hooked on charcuterie. Our Saturday dinner party guests were greeted with this charcuterie board: Soppressata, Beef Bone Marrow Mousse w/ Balsamic, Duck Prosciutto, Duck Loaf, Roaring 40's Blue Cheese and homebaked San Francisco Sour Dough Bread.

Let's get to the February project... Pancetta!

I just happened to have a couple 2- pound chunks of Red Wattle Pork Belly from Heritage Foods that I froze in November. Red came from Lazy S Farm in Kansas.  Check out the link below: http://www.heritagefoodsusa.com/farmers/index.html 

Ode to the Red Wattle Pork Belly

Mr. Red Wattle, the pig, was raised on a Kansas farm
In a loving place that caused him no harm
Grazing in the fields, snoozing in the barn
Growing into pork meat, becoming food porn

Ms. Oinkjoint, the cook, was raised on a Kansas farm
In a loving place that caused her no harm
Preserving garden vegetables, butchering fattened chicks
Her mom taught her homemade recipes to fix

All that is left of 5lbs of bacon
Mr. Wattle's 9lb belly and Ms. Oinkjoint met
Soon there was American bacon you can't forget
There was bacon risotto, bacon in everything
Even bacon with butterscotch hanging on a swing

Then Mr. Red Wattle goes Italian, becoming fancy bacon
When Ms. Oinkjoint's pancetta project was in the makin'
Red stars in spaghetti carbonara, a sexy Valentine's Day dinner
That Ms. Oinkjoint will prepare in hopes that her blog is a winner


Rolling Red
The Project:
What would I like to share from the pancetta making process?  First, always start by sterilizing all equipment and work surfaces with a Clorox and water. I had to dig out my small scales that measure .1 gram in order to weight the spices. 


Rolling is a two person job... one to roll and one to take pictures. And of course one to hold the roll tight while the other ties the string. Thanks Sweety... That looks really good.

Next Step:  Hang the pancetta in a place that is 50-60 degrees and 60% humidity.... hummmm, Where could I find such an environment?  It seems reptiles need a similar set of controls for their aquarium and PetCo had just what I needed. And hey if this project doesn't work, I can always get a pet snake or lizard. 

My Homemade Curing Cabinet...  I found my son's old dorm room fridge in the basement.  I bought a Zoo Med HygroTherm Humidity & Temperature Controller and Zoo Med Repti Fogger.  I plugged the fridge and fogger into the Controller, placed the sensor in the fridge, retro fitted a smaller tube on the fogger (this needs to be  improved) so that I would not have to drill a hole in the fridge... and I have 55 degrees, with 60% humidity.  Most of the time.  The more and fresher the product being cured the higher the natural humidity is in the box. And the fridge tends to lower the humidity when it runs, but I find I have a bigger problem keeping the humidity low enough. I crack the door open at night when the room is around 60 degrees to help control the humidity.  I think my box is too small and need a bigger fridge. 


Retro-fitted Curing Cabinet


The Reward: 
Spaghetti Carbonara:  I use a classic recipe from Saveur magazine... toast the black pepper in olive oil, delicately move the pasta from the water straight (no draining) to the pancetta, egg and cheese mixture and then using enough pasta water to make the sauce.  For Valentine's Day, Mr. Wattle shares the stage with a seared pork tenderloin from Spain... Solomillo Ibérico de Bellota - Ibérico Pork Tenderloin. The king of PIG... acorn fed 'Pata Negra' pork from Spain. This stuff is awesome.  Mr. Iberico is served with a simple orange gastrique.


I know you have seen this before.... but it really was the best spaghetti carbonara I have ever made... and the pancetta was perfect for the dish. 

Wednesday, February 2, 2011

Crispy, Custardy Popovers


Fresh out of the oven

Ratio by Michael Ruhlman is my baking bible. The Popover ratio makes the best popovers. I have perfected the process to create a popover that is crispy on the outside and has a custardy texture on the inside. A light smear of orange marmalade melted on the inside and it has become my favorite breakfast. They are around 200 calories each.

My lessons learned: 

Weigh exactly as the Ratio book states:  1 part egg, 1 part flour and 2 parts liquid. I use 2% milk. Kitchen scales have taken the place of measuring cups at my bake station.

Use a popover pan. I have the six - 6oz Chicago Metallic Pan. (Under $20) The perfectly sized batch for this pan starts with 3 extra large eggs. Follow the rest of the ratio weights from there.

Let the batter hydrate, like Ruhlman says, it makes a better texture and "pop."

Pre-heat your oven and the popover pan.  When the pan is 450 degrees, remove from oven and put a very thin slice of butter in each cup, just enough to cover the bottom. Return to the oven to brown the butter for just a minute or so, being careful not to burn. This step flavors the popovers with nutty browned milk solids. Open and close the oven quickly so that the temperature stays at 450.


After 10 minutes when I  lower the temp
 When the butter is browned, fill cups evenly with the hydrated batter. Set the timer! 10 minutes at 450, then lower the oven  temp to 375- don't open the oven door.  I bake for another 32 minutes until the popovers are nicely browned and appear mostly dry.


The popovers are crusty on the outside as you can see from the crumbs on the plate and moist on the inside.


                                                                                                                                                                           You can't see it in the picture, but steam is rising from the inside.  Be careful when you open the first one.

The leftovers are easily warmed in 400 degree oven. Break open a popover and insert a thin slice of ham, a slice of low fat Swiss cheese and you have a great sandwich for lunch.

These are easy and a special treat.

PS- Buy the cookbook Ratio, by Michael Ruhlman. It is a must have for all cooks and bakers.

Wednesday, January 26, 2011

Welcome to my pork tails....

I grew up on a small farm outside of Lyndon Kansas.  We raised cows, pigs and chickens that we butchered for food. We had laying hens and a very large garden in which my mother taught us how to preserve for winter. Basically, we were self-sufficient except for the raw milk we bought in big glass jars from the dairy down the road.  I belonged to the Lyndon Leaders 4-H club. And was awarded the Lyndon High School Betty Crocker Homemaker of the Year in 1974 .  As I was growing up, I wondered why we bothered with such effort when we could go to the store to buy food. But living off the land was a way of life... it is what we did.

I pursued my destiny by majoring in Home Economics at Kansas State University for three semesters. And then I made an about turn in my life.  I went to Kansas University, majored in accounting and business and have worked in State Tax Administration 30 years. Food became a hobby and a reason to get  family and friends together.

However, my hobby has grown to an obsession. I recognized my passion for all things food. I studied the work of the best chefs. I collected the best cookbooks. I remodeled my kitchen to accommodate my thermo-circulator bath.  I stocked up on molecular gastronomy chemicals and gadgets. I planted a small vegetable garden in the front yard of my Fairfax VA home. I have successfully prepared a number of different dishes from El Bulli, Alinea, French Laundry, Under Pressure, On the Line, Craft of Cooking, Momofuku and yes, Charcuterie.  (NOMA is next, as soon as I can purchase some hay.) I gave my daughter and her boyfriend cooking lessons taught by ME for Christmas. Did I go wrong leaving K-State in 1975?

I think the signals are clear... it is time to return to my roots and do what? Hopefully, this blog will help me figure that out.